Well, it is now the end of the year and a time for reflection. I have done A LOT.
January -- I don't remember what I did last January. Eh, I think I just tried to stay on top of everything, especially as I signed up to be Hospitality shepherd (read: coordinator) for our parish.
February -- This month is also a blur. I am pretty sure I started making the massive over-achiever poster for Pre-Sanctified Liturgy meal sign ups.
March -- Lent started. I made a baby terry cloth poncho out of a dishcloth because the one I saw at the gap cost $15 and I thought, "That is just a dishcloth with a hole in it".
April -- Holy Friday fell on Lance's birthday. Or something like that. Could not make pysanky due to dyes and baby. She was still a baby then! And I couldn't fit into my Pascha dress because my boob was too big. I made Nina a cute jumper with a willow pattern and started a skirt for me...that I still haven't finished. Hmm... I also completed a hat for Nina for Pascha.
May -- Wedding anniversary: it was 8 years! Wow. I bought a bunch of material in hopes of making Nina a TON of summer clothes. That never happened. Still have the material. I did make Nina a hat.
June -- Eh, more of a blur. I adjusted a skirt.
July -- Blur. Mom visited and that was awesome.
August -- Nina tosses hat to the winds.
September -- I start making matrushka dolls and finish Nina's hat for Santa Fe. Made dress for Nina out of old skirt. Stats class started.
October -- Nina's birthday with massive amounts of stuff making: party hats, invitations, cards for food, and various other items. Then massive doll and jewlery making for the All American Council. Whew.
November -- Matrushkas still not complete. Oh well.
December -- Matruskas still sitting there in sad pile. Have 50 pounds of fleece in hopes of making Nina pants. Discover Nina likes vests and needs more shirts. *sigh* And she out grew her socks. Have big plans to complete Christmas presents and am done with about a quarter of them. *HUGE SIGH* But stats complete, which is sad because I liked it.
Still, it has been a good year. It has been good even if most of it is a blur. Blurs are good -- blurs mean that I have been so busy and nothing bad has happened that I cannot remember. A good year indeed!
Showing posts with label sewing. Show all posts
Showing posts with label sewing. Show all posts
Wednesday, December 21, 2011

Monday, October 3, 2011
Making Mahtrushkas
I have no idea how to spell it, but basically I am making little Russian nesting dolls sans the nesting part.

I have an affection for these matrushkas -- I just think they are cute. I found one in the middle on etsy before Nina was born that I really liked and I wanted to make more for her. Then I got in in my head that I would make them for the AAC booth our church is having as a fundraiser.
I have been working through various patterns as prototypes. Matush.1 is on the right here. I named her Isabel -- I like the skin tone. I trimmed along the seam lines on the inside and then she started coming apart at the seams.

So then I made Matush.2, also known as Lucy, inspired by my friends' daughter Lucy who is quite tan with blonde, blonde hair and pretty green eyes.

I left the seams alone and the doll seems more sound, but both .1 & .2 look like little Muslim girls in burkas. So, enter Matush.3. with shortened headscarf in back.

Her name is Annie because her hazel eyes remind me of the cartoon Orphan Annie. The effect is much more Matrushka like and less Muslim. The head is better, but obviously the side of her body is a bit off. I think I will stick with the regular pattern shape for the bottom but change the head seams.

More to come! I don't know how many dolls Nina (and other various relations) will have at the end of all this as I don't feel I can sell my prototypes because they are not well made. Gah! I have a goal of five for the booth though.

I have an affection for these matrushkas -- I just think they are cute. I found one in the middle on etsy before Nina was born that I really liked and I wanted to make more for her. Then I got in in my head that I would make them for the AAC booth our church is having as a fundraiser.
I have been working through various patterns as prototypes. Matush.1 is on the right here. I named her Isabel -- I like the skin tone. I trimmed along the seam lines on the inside and then she started coming apart at the seams.

So then I made Matush.2, also known as Lucy, inspired by my friends' daughter Lucy who is quite tan with blonde, blonde hair and pretty green eyes.

I left the seams alone and the doll seems more sound, but both .1 & .2 look like little Muslim girls in burkas. So, enter Matush.3. with shortened headscarf in back.

Her name is Annie because her hazel eyes remind me of the cartoon Orphan Annie. The effect is much more Matrushka like and less Muslim. The head is better, but obviously the side of her body is a bit off. I think I will stick with the regular pattern shape for the bottom but change the head seams.

More to come! I don't know how many dolls Nina (and other various relations) will have at the end of all this as I don't feel I can sell my prototypes because they are not well made. Gah! I have a goal of five for the booth though.
Friday, October 8, 2010
Lessons Learned
We have been so incredibly lucky to have generous friends. We have baby gear coming out our ears and I can't think of any gadget, gizmo, or what not that we still need.
 Looks great,no? I like that someone stenciled a design on the side - sign of the 80's!
 View from above - I think it looks ready for a baby.
Lance was of the opinion that we needed a liner. I think the metal sides worried him. We could order one online for $30, but most of them were frilly and looked odd. So, I decided to test my recently acquired sewing skills to see if I could create a liner.
It was nothing short of disaster.
First, I forgot that I hadn't washed the fabric I was using for the sides. I also had no pattern - I thought I would just use my math skills and "wing it". Above all, I had no idea what I was doing.
 It doesn't look too bad from above, but you might notice the oddly shaped corner on the left (along with a bit of my toe and belly!).
 It is a bit more apparent in this photo. When I took this photo, I was still working on repairing the odd corner. I had washed the material by this time and it had shrunk and I had to rip out the whole corner, find some scrap fabric because I had already pinked that area, and then piece something together. It was really difficult, especially as I had already added the elastic.
 Unfortuntely, that corner still looked odd, but I didn't have the mattress in yet.
 It continued to look weird, but a little better than when it came out of the wash.

To test the stability of the liner, I used two 3-lb weights to serve in place of a baby. As you can see, that corner is still odd. I did have the elastic edge pulled toward the upper frame and not over the handles. Also, a bit of my belly managed to make it into the frame!
It looks more stable and generally better. As the child gets heavier, I am hoping the liner will hold up. I suspect it will or I might make another now that I have a better idea of what I am doing.
In short, the lessons I learned are:
1) Always wash the fabric! I should have known I had not because there was no fraying on the cotton fabric! Geez - what was I thinking!
2) When sewing for three dimensional space, allow more fabric than you think. I should not have pinked the edges until I had washed the whole thing that way the seams had time to adjust. I should have also waited to add the elastic till I was absolutely sure about the sides and given myself plenty of fabric to use.
3) A magnetic assistant is invaluable - it helped pick up stray pins out of the bassinet as well as off the floor. I chose the cheap route and used this little guy a student gave me a while ago.
 Yes, it is a magnetic from Senor Frog. Don't dis the frog - he worked just as hard as I did on this liner!
Some friends of the family kindly loaned us a bassinet, which means we didn't have to plop down $300 to $600 on a new bassinet.
It also meant a compromise between Lance and I - he wants the baby in the bed and I say "no way". He is caught up in the moment of having a little person in his arms and I am thinking that I will be with the little person all day and will want my space. I am also not convinced it is entirely safe since my own parents had an incident when they tried keeping me in the bed. Apparently I got stuck between the bed and wall - explains a lot, doesn't it?
Anyhow, the loaner bassinet is old, in great condition, and will allow us to keep the little one in our bedroom. Because it is an older style, I had to special order a mattress, which was surprisingly affordable and fits it well. I was able to find a set of two bassinet sheets at Ross for $2 and they held up in the wash and are pretty soft. I felt I had done everything possible to update and prepare the bassinet for the baby.
 Looks great,no? I like that someone stenciled a design on the side - sign of the 80's!
 View from above - I think it looks ready for a baby.
Lance was of the opinion that we needed a liner. I think the metal sides worried him. We could order one online for $30, but most of them were frilly and looked odd. So, I decided to test my recently acquired sewing skills to see if I could create a liner.
It was nothing short of disaster.
First, I forgot that I hadn't washed the fabric I was using for the sides. I also had no pattern - I thought I would just use my math skills and "wing it". Above all, I had no idea what I was doing.
 It doesn't look too bad from above, but you might notice the oddly shaped corner on the left (along with a bit of my toe and belly!).
 It is a bit more apparent in this photo. When I took this photo, I was still working on repairing the odd corner. I had washed the material by this time and it had shrunk and I had to rip out the whole corner, find some scrap fabric because I had already pinked that area, and then piece something together. It was really difficult, especially as I had already added the elastic.
Final product:
 I had originally thought to put the material I used for the deck (bottom) as the material for the sides. I am glad I didn't - it is a bit loud!
 I had originally thought to put the material I used for the deck (bottom) as the material for the sides. I am glad I didn't - it is a bit loud!
 Unfortuntely, that corner still looked odd, but I didn't have the mattress in yet.
 It continued to look weird, but a little better than when it came out of the wash.
To test the stability of the liner, I used two 3-lb weights to serve in place of a baby. As you can see, that corner is still odd. I did have the elastic edge pulled toward the upper frame and not over the handles. Also, a bit of my belly managed to make it into the frame!
When I place the edge over the handles, it looks like this:


It looks more stable and generally better. As the child gets heavier, I am hoping the liner will hold up. I suspect it will or I might make another now that I have a better idea of what I am doing.
In short, the lessons I learned are:
1) Always wash the fabric! I should have known I had not because there was no fraying on the cotton fabric! Geez - what was I thinking!
2) When sewing for three dimensional space, allow more fabric than you think. I should not have pinked the edges until I had washed the whole thing that way the seams had time to adjust. I should have also waited to add the elastic till I was absolutely sure about the sides and given myself plenty of fabric to use.
3) A magnetic assistant is invaluable - it helped pick up stray pins out of the bassinet as well as off the floor. I chose the cheap route and used this little guy a student gave me a while ago.
 Yes, it is a magnetic from Senor Frog. Don't dis the frog - he worked just as hard as I did on this liner!
Monday, September 27, 2010
Sewing on My Own
The most exciting thing about sewing is that one can choose her own textiles. I only found a few bedding sets in stores that I liked but were well beyond the amount I am willing to pay. Those bedding sets that were in my price range were not very interesting. Even shopping in consignment shops, the selection of baby bedding is sad.
Sewing has enabled me to create my own bedding without having to settle. I was so excited to finish the crib sheet, I began work on the dust ruffle for the crib using some fabric I had selected years ago for my classroom. I didn't think then that the material was for a baby, I just liked the colors! It works well for the dust ruffle though. (REMEMBER: click on the picture to bigify!)

My only wish is that I had chosen a pattern set that was less fussy. There were all sorts of odd tricks and turns to making the ruffle - the bottom consists of three parts oddly sewn together.
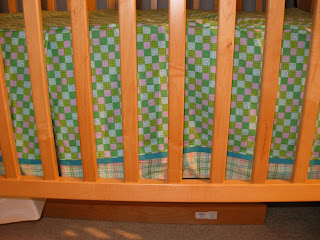
The material ended up being so thick, I had to adjust the tension. I then re-read the directions for the end pieces only to discover that I had pressed the lower third section incorrectly on the longer sides. Oh well - with my not so straight sewing, it hardly matters! Even with measuring using several rulers and one protractor, the pieces didn't quite match up and I had to gather material along the way. I also learned that when the pattern says "baste", one should baste and not pin! Thankfully, I learned this lesson before I had to make the pleat!

More importantly, the dust ruffle fits for the most part! Hurray! If I were to make another for when our little one is older, I am hoping I can just measure from the floor to the deck of the bed and sew one long piece - without a pleat!
After finishing the dust ruffle, I was so enthralled, I wanted to make blankets like the one I received at a baby shower.

A childhood friend's mother had sewn it using her mad ninja sewing skills. It is so soft and well put together, I really wanted more of these!

Since my straight stitching isn't so straight, I was not going to attempt any curved corners or try for the fancy stitches (after consulting my manual, my machine does not do that anyway). I had purchased two fabrics in Houston both with owl designs - one was a thick flannel and the other a normal cotton cloth. I didn't want owls on both sides of the blanket, so here in Seattle I purchased some light flannel and regular cotton cloth with polka dots. I first attempted to work with the heavy flannel and the blanket resembles a sopapilla rather than the flat, smooth tortilla of the "model" blanket.

I do like the material - it's just that I made the mistake of not sewing up most of the sides and then cutting the material a little closer. So, in addition to being puffy, it has this long straight stitch on one end and looks a little funky. However, it is soft and a good weight for sleeping. I did attempt a fancy stitch - a zigzag! I turned corners! Yay me!

I then used the other two fabrics and took care to have both pressed, neatly lined up, and decided to stitch most of the way around the blanket so that there would be no external straight stitch. It almost worked - it is less poofy than the other!

I still cut too close to the edge AND I marked on the right side of the cloth so that I could not see where I was stitching! I ended having to rip one side because of this. Also, I neglected to test out the zigzag length before I began stitching, so there is a little section of zigzag that is different than the rest. I was so tired however, I decided to use my artistic license and leave it instead of ripping it out.

I do like the owls in this blanket - they have a lot character and it will be good to point out to our little one. I am so glad they are not "Disney-fied" and are interesting!

Now I have to take a brief break from the sewing and finish preparing the room for the baby! I have crates to move, this computer to relocate, a bassinet line, and a need to turn our computer desk into a changing table. Let the nesting begin!
Sewing has enabled me to create my own bedding without having to settle. I was so excited to finish the crib sheet, I began work on the dust ruffle for the crib using some fabric I had selected years ago for my classroom. I didn't think then that the material was for a baby, I just liked the colors! It works well for the dust ruffle though. (REMEMBER: click on the picture to bigify!)

My only wish is that I had chosen a pattern set that was less fussy. There were all sorts of odd tricks and turns to making the ruffle - the bottom consists of three parts oddly sewn together.

The material ended up being so thick, I had to adjust the tension. I then re-read the directions for the end pieces only to discover that I had pressed the lower third section incorrectly on the longer sides. Oh well - with my not so straight sewing, it hardly matters! Even with measuring using several rulers and one protractor, the pieces didn't quite match up and I had to gather material along the way. I also learned that when the pattern says "baste", one should baste and not pin! Thankfully, I learned this lesson before I had to make the pleat!

More importantly, the dust ruffle fits for the most part! Hurray! If I were to make another for when our little one is older, I am hoping I can just measure from the floor to the deck of the bed and sew one long piece - without a pleat!
After finishing the dust ruffle, I was so enthralled, I wanted to make blankets like the one I received at a baby shower.

A childhood friend's mother had sewn it using her mad ninja sewing skills. It is so soft and well put together, I really wanted more of these!

Since my straight stitching isn't so straight, I was not going to attempt any curved corners or try for the fancy stitches (after consulting my manual, my machine does not do that anyway). I had purchased two fabrics in Houston both with owl designs - one was a thick flannel and the other a normal cotton cloth. I didn't want owls on both sides of the blanket, so here in Seattle I purchased some light flannel and regular cotton cloth with polka dots. I first attempted to work with the heavy flannel and the blanket resembles a sopapilla rather than the flat, smooth tortilla of the "model" blanket.

I do like the material - it's just that I made the mistake of not sewing up most of the sides and then cutting the material a little closer. So, in addition to being puffy, it has this long straight stitch on one end and looks a little funky. However, it is soft and a good weight for sleeping. I did attempt a fancy stitch - a zigzag! I turned corners! Yay me!

I then used the other two fabrics and took care to have both pressed, neatly lined up, and decided to stitch most of the way around the blanket so that there would be no external straight stitch. It almost worked - it is less poofy than the other!

I still cut too close to the edge AND I marked on the right side of the cloth so that I could not see where I was stitching! I ended having to rip one side because of this. Also, I neglected to test out the zigzag length before I began stitching, so there is a little section of zigzag that is different than the rest. I was so tired however, I decided to use my artistic license and leave it instead of ripping it out.

I do like the owls in this blanket - they have a lot character and it will be good to point out to our little one. I am so glad they are not "Disney-fied" and are interesting!

Now I have to take a brief break from the sewing and finish preparing the room for the baby! I have crates to move, this computer to relocate, a bassinet line, and a need to turn our computer desk into a changing table. Let the nesting begin!
Wednesday, September 8, 2010
Sewing
When I got married, my mother insisted that she make my wedding dress. I had found a dress I liked, the dressmaker wanted $700 for it (pretty reasonable), and I was willing to pay. However, typical of our family, my mother looked at it and said "I can make that". So she did.
 The crib is from Peg and Gregg - they purchased it at Land of Nod for us. I like it - it is very simple.

Hurray for froggies! I used this material in my classroom, and I washed TWICE before I sewed with it. Here is the pattern up close.

It is a bit blurry, but one gets the gist - it is colorful and cute!
Next up is a dust ruffle for the crib, which will take a bit of time. The nice thing is knowing I have Emily as in-state tech support and a book to reference. Onward!
The unfortunate thing is I had cancer and I didn't know it. I continued to lose weight and I believe I was around 90 pounds when Lance and I got married. So, my mother travelled to Santa Fe and found I had lost more weight (I was perhaps 95 pounds at the initial measuring) and was forced to alter my dress, which meant buying a sewing machine.
My grandmother was the one who made the purchase and gave it to me as a wedding gift. I took it with a smile knowing that it would remain in my closet for years to come.
My mother is great seamstress and I helped her cut and pin several projects growing up. However, sitting at the machine and pressing the pedal was beyond my abilities. My reluctance to sew stems from a deep fear of needles and it has been with me long before I ever saw designers get injured on "Project Runway".
I had longed to conquer this fear of the sewing machine, but unfortunately my usual strategy of not looking at the needle when I am near it does not work for this activity. It is all well and good to turn away when you get blood drawn, but one must pay attention to the position of the needle when sewing.
When I learned I was pregnant, I was excited (for some reason) about sewing. But where to begin? I selected fabrics, I purchased patterns, and even showed them to my mom. She was more than willing to sew all of it for me, but I really wanted to do it myself. Part of the reason might be that it is a skill I would like to pass on to my children. I learned how to crochet and embroider from watching my grandma and mom, so surely sewing could be something I could pick up on sight.
That turned out not to be the case. My mother would guide me through the process, but I was still quite frightened of the machine. I freighted over what I would do with all of this material and notions I had purchased -- it seemed like a waste.
Happily, my friend Emily Lorelli was more than willing to help guide me through the process. Some how working with her helped me conquer my fear of the machine. Perhaps I needed to view more than one person operating it without harm to convince me that I too could sew.
This afternoon I forced myself onto the machine. Taking a few scraps, I tested out my skills - I am not very good at keeping the stitches straight.
"Whatever," I internally said, "I'm getting this finished."
Emily had pieced and sewed most of the crib sheet last Saturday and the only thing it needed was three more corners of elastic. And so I sat down, stretched the elastic, pinned it, and sewed it!
And here is the finished product!
 The crib is from Peg and Gregg - they purchased it at Land of Nod for us. I like it - it is very simple.
I wanted a gender neutral pattern not only because we are not sure of the gender of our child, but I am not into frilly, girly stuff.

Hurray for froggies! I used this material in my classroom, and I washed TWICE before I sewed with it. Here is the pattern up close.

It is a bit blurry, but one gets the gist - it is colorful and cute!
Next up is a dust ruffle for the crib, which will take a bit of time. The nice thing is knowing I have Emily as in-state tech support and a book to reference. Onward!
Subscribe to:
Posts (Atom)